
This post describes how to extract an Impulse Response (IR) from a Fishman Aura Spectrum (Aura) acoustic guitar body image that can be loaded into an IR block in the new Line6 Helix amp modeler. There are some free IRs on the Web that you can try with your guitar to see if this is something that might work for you. If you don’t have a Helix, you can still use the IRs by using a computer and programs like Apple MainStage and SpaceDesigner that support loading any IR in track plugins.
Background
I’ve been trying for years to get a good live acoustic guitar tone. I started with K&K pickups that combined a piezo under the body pickup with a pencil condenser mic. That sounded OK. The piezo wasn’t as bright or quacky as typical under the saddle piezo pickup setups, and the mic sounded good. But it required an external preamp to power the mic and mix it with the piezo, and teneded to feedback a lot.
After seeing James Taylor use a Line6 Variax 700 Acoustic, I got one and used it for years. It sounded better than most under the saddle piezo pickups, had lots of useful instrument models, played nice, and was very convenient, predictable and consistent for live gigs. But it always seemed to have a somewhat “digital” tone that was a bit harsh. I tried to EQ that away, and that helped. But I could never get a sound that made me go wow, and found I was reluctant to play some songs that featured the guitar because the tone just wasn’t that satisfying.
Then I saw that James Taylor used an Aura to get his fantastic live acoustic guitar sound. So I got one and it changed everything. I could now use my small, light Martin 00C-15AE guitar and a nice Taylor 314cd – Neumann U87 body image to finally get the tone I was looking for. In summary, the Variax 700 Acoustic sounded better than the 00C-15AE with just the Fishman under the saddle pickup. But through the Aura, the 00C-15AE sounded a lot better than the Variax. And that little Martin guitar has a magic feel that’s hard to describe.
I play three different instruments in most of our live gigs: mandolin, acoustic guitar, and electric guitar. I use a Collings mandolin with a K&K pickup, the Martin 00C-15AE, and a Stratocaster Deluxe with Tom Anderson pickups for electric guitar. That’s a complicated set of instruments with very different amplification requirements. I’ve been using Line6 amp modelers for years to provide a single device that supports patches for all three instruments direct into the PA. I recently upgraded from a POD HD500X to the new Helix and it really improved the usability and tone of my setup.
The Helix has support for Impulse Response (IR) blocks. So it seemed like it should be possible to use an acoustic guitar body IR block to free up the Aura for other uses, and further simplify my live rig. The rest of this post describes how to extract a body image from the Aura that can be used in a Helix IR block that reproduces the body tone.
Picking the Fishman Aura Spectrum Image
The first step in the process is to pick the image you want to extract. Picking the image requires auditioning the available images to pick the ones that work best for you, your particular guitar and playing style. You could send your guitar to Fishman and get a custom image created, but that’s expensive and probably unnecessary.
Here’s some guidelines for picking the image:
- Start with a properly setup guitar with new strings
- Use the pick you will use most of the time – using thicker, rounder picks for warmer tone
- Either use your computer or Helix with the Aura in an effects loop so you can record a short acoustic guitar loop to simplify the auditioning process. This lets you listen to only the processed sound, and leaves your hands free to select different images.
- Take notes on the images you like so that you can narrow down a small set that meet your needs.
- Be sure to audition through the speaker system you’ll be using live. What sounds good through headphones might not sound good at all through a speaker system. For example, I really liked the Aura Martin body images through headphones. But through speakers they had a ring and tended to feedback very easily. I suspect this is because of an emphasis around 200Hz that’s what makes Martin guitars sound they way the do and cut through. They might work for you, but I found the Taylor images to more suitable for my needs.
- Audition with the guitar still plugged in (if you are using a looper) so that any feedback issues will still be detected. Verify your final selections playing live to make a final check for any feedback issues.
- Make sure the Aura has the tone controls set flat, has the blend control set to full body (all the way up), and the compressor is turned off. You want to only hear and capture the body sound. Tone controls, blending and compression will be done outside the IR block using other Helix blocks.
- Start with body models that match your guitar directly or at least the body style and wood. You may find that other body images sound better. Don’t get stuck on what’s suppose to be “right”. Experiment with other body styles and woods, and pick the one that sounds best to you, for your style application, and amplification system.
- Use the Aura Gallery III app to load additional images into the Aura User patches if needed.
Once you have a set of body images selected, you’re ready to capture and convert them to IRs.
Setup the Audio interface
Helix supports nearly all IRs in .WAV format. However, the Helix application may
automatically change its attributes before sending it to the Helix hardware:
- Converts all .WAV IRs to 48kHz mono and 16bit.
- On Mac OS X, as of version 1.04.3, Helix will not load or convert WAF files with sample size of 24 bit. These files need to be converted to 16 bit before loading into Helix.
- When loading a stereo file, Helix Edit uses only the left side.
- Shortens (or lengthens) the IR to 2,048 samples (about 43 msec).
- The user may choose a 1,024-sample version to save DSP. This option simply fades out the IR halfway through.
Helix’s IR blocks only point to a specific IR number (1-128); they don’t include the IR
files themselves. People using your Helix patches will need the same IR file assigned to the same IR index number to perfectly recreate the preset. Otherwise they will need to edit the patch and change the IR index number to where they loaded the IR.
Set your audio interface sample rate to 48000Hz and set the sample size to 16 bits. If your audio interface won’t support this setup, you will need to use an audio utility app to convert the sample rate or sample size before loading into Helix.
Capture an IR for the selected Aura Image
To capture an IR from the Arua, you need to connect the Aura to you computer using your audio interface. Connect an output of your audio interface to the Aura input, and connect the Aura output to an input of your audio interface. You can of course use Helix as your audio interface, but use a large buffer size and long latency to be sure to avoid any clicks and pops. In the examples below, I used a Focusrite Saffire Pro 40, connecting Line Out 3 to the Aura input, and connecting the Aura output to Input 7.
Make sure the Aura is set as follows:
- EQ on the pickup only and/or EQ controls are set flat
- Set the blend at 100% (all body)
- Turn the compressor all the way down
- Adjust the Volume for good signal level and no clipping (-18dB is a good target level).
To capture the IR:
- Open Logic Pro X Impulse Response Utility
- Create a project with these settings:
- Mono project
- Sweep Channel – the audio interface output connected to the Aura input (3: Line 3)
- Set the Input to the audio interface input connected to the Aura output (7: IP 7)
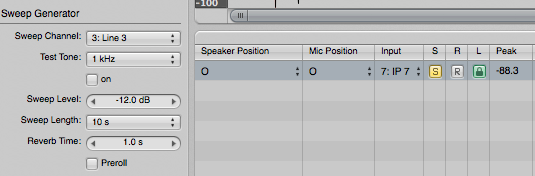
- Set Sweep Length to 10 s.
- Reverb time is not important in this case because there’s no reverb to capture after the sweep. So set it as low as possible.
- Save the project using the same name as the Aura image you are capturing
- Click the Record button and then click Sweep
- Check the levels and make sure there is no clipping. The levels can be adjusted in the IR utility, using the Aura Volume control, or the audio interface input channel gain control
- Press Deconvolve
- Trim the beginning if the IR to remove any empty content – use the scroll bar to zoom in order to see the beginning or end clearly.
- Crop the IR to about 43 milliseconds. If you drag from the beginning, you can see the actual length in samples in the upper right corner. Drag so the length is 2048 and then press Crop to get just that sample.
- Add a short fade at the end to avoid any potential clicks.
- You can audition the IR using a .aif file that captures a recording of you guitar’s piezo pickup.
- Click Create Space Designer Setting… – use the project name as the IR name. This creates a file: ~/Music/Audio Music Apps/Impulse Responses/<project name>.SDIR that is the IR.

Convert the IR file as needed.
You may need to do some conversions of the IR before loading them into Helix. The Saffire Pro 40 cannot be set to 16bit sample depth (neither can Helix), so I had to convert the .wav file. I use felt tip Sound Studio for these conversions, but there are many audio utilities that will work.
- Rename the .SDIR file to .wav so that it can be loaded into Helix
- The file should have Sample rate 48,000 Hz and, Bits per sample 16.
- If the sample size is 24 bits, use Sound Studio to load the IR and re-save it with sample size set to 16.
Load the IR into Helix
Use the Helix app to drag and drop the IR .wav file into an open slot in the IMPULSES pane.

Then add an IR block to your acoustic guitar patch and select the IR index number to the desired guitar body image. Add EQ, effects and preamp models as needed to get the range of tones you need. I’ll have another blog posting on my Helix acoustic guitar patch soon.
If you reconnect your Aura through a Helix effects loop and select the same body image in the Aura, you can compare the sound of your captured IR block with the sound through the effects loop. If everything was done correctly, you should not be able to hear any difference between the two.
Some final thoughts
Using body images as IRs in Helix really opens up the possibilities for using Helix as an effects processor for many instruments besides electric guitar and bass. Body images such as those in the Fishman Aura Spectrum really do turn a quacky piezo sound into the wonderful, complex fullness of a good acoustic guitar.
The Aura images are more than just the body IR. There are complex algorithms used to create them based on the difference between the pickup and body sounds along with phase corrections. How to create an acoustic guitar impulse response shows how to capture an IR for your guitar. Bodilizer is used to analyze the difference between the body and piezo impulse responses. Unfortunately, Bodilizer doesn’t currently provide any means of exporting an IR that can be loaded into Helix. And Bodilizer development seems to be stalled. There are a few acoustic guitar IRs available on the Web, and hopefully Line6 will decide to support some in future Helix updates. But for now, capturing them from a Fishman Aura is a very good option.
You can try blending the body response with the guitar pickup by adjusting the Mix control of the IR block. Adding a little piezo and add definition and attack to the tone without adding too much quack. Some compression can also help tame any piezo attack emphasis and make the guitar stand out better in the mix. You can also use Logic Pro X Match EQ to attempt to match the piezo pickup output to the sound of your mic’d guitar. That will create an EQ curve that you could replicate in a Helix EQ block to better blend between the pickup and body tones.
Good luck, and I hope this helps get even more out of your Helix investment.
| Evernote helps you remember everything and get organized effortlessly. Download Evernote. |
I just found this, do you have any helix acoustic patches you could share that have and IR in them for use with the JTV69 acoustics thanks
Coming soon.
Jim,
Also your tag line at the top should read “For the Practicing Musician” since some of us are not Amateurs.
Pingback: Creating a Helix Acoustic Guitar Patch | jimamsden
Hi Jim,
Are there any other units, other than the Aura, that can be used to make IR’s?
Is Logic the only program that will make IR’s?
BTW… Great article!
Best,
Bill Dutcher
There are other units and apps, these are just the ones I have. Google and you’ll find other options. The Zoom A3 Acoustic Guitar Preamp and the TC Electronic bodyRes Acoustic Pickup Enhancer look interesting, but I’ve never heard them. voxengo.com might be a good plugin option, but I haven’t use it. There’s nothing unusual about these IRs
Zoom might have one. Google and see what you find. The process for extracting the IRs would be the same.
Will you be sharing your aura IRs at some point?
thanks did the great tutorial. I would also like to check out any acoustic IRs you’d care to share.. thanks!
Where is the crop button in Logic’s IR Utility? I can’t find it in Logic Pro X (IR utility doesn’t work right there for me in Mavericks anyway, can’t zoom in vertically) or in 9.
Also, once I figured out the conoluted (pun intended) way it does this, I can NOT find my blasted .SDIR files at ALL!
Hi there, thanks for the tutorial. I do not have an Aura Pedal, but rather the (aftermarket) Aura Ellipse that I had installed into my Gibson J-45. Could that be used to transfer the IR’s?