
The Coronous virus pandamic is certainly having an effect on all of us. This may be the event of the century and has the potential of changing our lives in ways that could last many years. But it has especially hit gig workers hard because their work was difficult and sporatic to begin with. Many gig workers don’t have a lot of savings, or health care. And they’re often last to benefit from any safety net such as tax breaks or unemployment insurance.
I don’t make my living through misic, and can easily work at home. But a lot of my social community is warpped up in music. I really looked forward to band practice every week. We would often have snacks and drinks after rehearsal. And I’ll miss playing the two to three gigs a month that we’ve been doing the last four year. And the coffee shop where we meet on Saturday mornings is now doing curb-side delivery only.
But every challenge is also an opportunity. We had our regular Saturday moring coffee today using Jitsi Meet. It wasn’t the same as in person, but it was ok and certainly better than nothing. Maybe this challenge will also remind us of how important and valuable social contact is and turn down the polarization volume a bit. That would be a nice outcome.
Another challenge is how we’re going to keep playing music. We need this to have something do do that we love, reduce stress, and keep our chops up. Since social distancing makes in person rehearsals unadvisable, we need to find some other solution to be able to play together. So I did some experimenting with on-line jamming solutions to see if that’s something that we could exploit. This post covers what I found, and provides some guidelines for successful on-line gigging.
Technical Requirements
The biggest issue with on-line jamming is latency. The only practical way to do it is to have a shared server that everyone connnects to that collects the individual contributions and sends out a time aligned mixed result. This requires the audio to go a complete round trip from your computer to the server and back for you to hear it. Add to this any latency contributed by your audio interface. To get an idea how this impacts playing, consider that you get about 1msec of latency for ever 10 feet from your amplifier. 50 feet woud be about 5msec. If you’ve ever been that from from your amp, maybe using wireless, you probably noticed a little latency. We can start detecting latency at about 10msec. Anything above 35msec or so is pretty noticeable. So for on-line jamming to work, we have to reduce latency as much as possible.
The first place to start is your audio interface. If you’re using Helix as your audio interface, then these won’t add much latency. Most reasonable audio interfaces today have pretty low latency, so this probably isn’t going to be an issue.
The next source of latency is your computer. If it has slow drivers, or has a lot of backgound tasks running, then latency could go up and you could get increased dropouts. Follow the same guidance as for optimizing your computer for use with your DAW and this shouldn’t be a problem either.
The next source of latency is the internet itself. It is essential that you connect your computer to the internet through an Ethernet cable, Wifi will just not work, it is too slow. Latency is also reduced if you have high-speed Internet access. 1GB rates provided by fibre optic is best.
The last source of latency is the server that is collecting and distributing the audio. Different on-line jamming solutions may have different server capabilities that make jamming practical and useful – or not.
So connect your audio interface to your computer using the fastest way possible (USB 2.0, USB3.0, Firewire, Thunderbolt, or USB-C) and connect your computer directly to your router using an Ethernet cable and you should be ready to go.
On-line jigging software options
Next we need some software that supports on-line jamming. There are two types of on-line jamming software, near real-time and real time. Near real-time solutions like NINJAM and jammr solve the latency problem by streaming synchronized musical intervals, or number of bars. For example, you might start with a drummer or drum pattern that plays for four to eight measures. After the section completes, the next performer starts and adds their part playing against the previous interval. The next performer adds their part on the previous part. Latency isn’t a problem because everyone is not actually playing at the same time. This can take a while to get use to but can work pretty well. Is more appropriate for jamming, and isn’t as useful if you want to actually work on a song with a specific arrangement.
Real-time jamming solutions however attempt to keep the latency low enough that a band can play together just like they would in the same room. This is ideal for on-line rehearsals and what is covered in this post. I found two software applications that support real-time on-line jamming, Jamulus and JamKazam, JamKazam is very nice. It supports multiple tracks and audio plugins. When I first tried it, I was very pleased. A a few days later the sever seem to be overwhelmed and I could not get even close to acceptable delay or audio dropouts. So I tried Jamulus and although it doesn’t have the features JamKazam has, it allows you to create your own server to help reduce latency and distribute the load. This post shows how to use Jamulus, and how to overcome its limitations to have even more capabilities than JamKazam.
Jamulus
Jamulus is a simple, easy to use, open-source solution for on-line jamming. Jamulus is open source software developed by Volker Fischer and released in 2015 that support real-time jamming and rehearsals over the Internet. A paper by Volder, Case Study: Performing Band Rehearsals on the Internet With Jamulus describes the Jamulus application, introduces the user interface, and discusses experiences with on-line jamming.
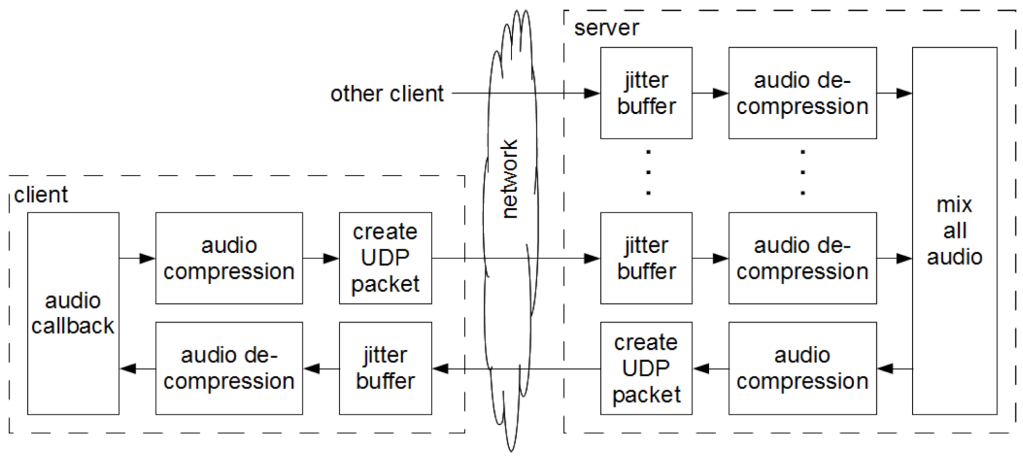
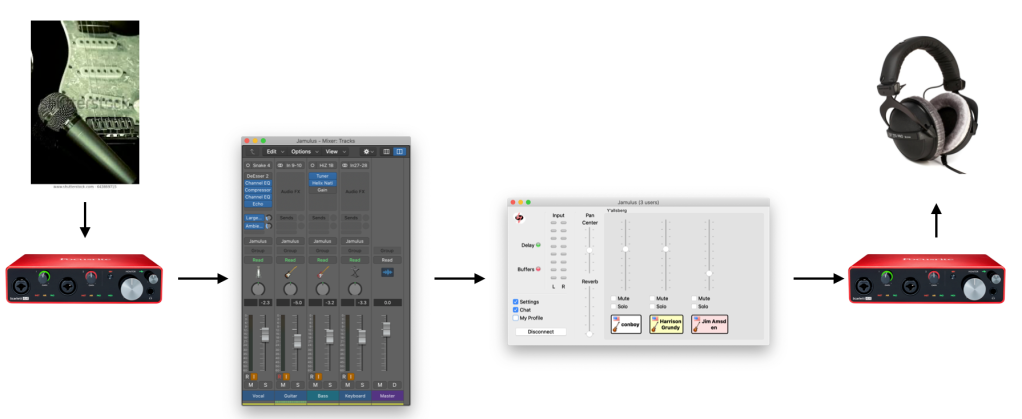
The way Jamulus works is each musician runs the Jamulus client app on their machine, configuring it to use their audio interface. Then everyone connects to a shared Jamulus server which mixes the input from each musician and then sends back the mixed result to each client.
Resources:
- Jamulus Home on SourceForge
- Jamulus Documentation
- Jamulus Settings window – describes how to configure the Jamulus client
- Server manual – how to setup your own Jamulus server
- Jamulus Open Discussion Forum
- Jamulus Online Musicians/Singers Jamming Facebook group
- Jamulus Source Code
- Jamulus Downloads
Installation
Download Jaumulus and install for your machine. For macOS, the download is a Jamulus.zip file that contains a Jamulus.dmg installer. Run the installer and drag and drop the Jamulus.app into your Applications folder in Finder.
This installs both the Jamulus client and server, which are in the same application.
Configuring Jamulus Client
Before attempting to use Jamulus, you need to find a way to connect your computer to your router using an Ethernet cable. Wired connections are necessary for Internet jamming as Wifi is too slow and introduces way too much latency.
Next connect your audio interface and make sure its working properly. Use the Audio MIDI Setup utility on macOS, or whatever you use to set device settings on your computer to ensure your MIDI interface is configured for 48kHz sample rate. Jamulus only works with 48kHz. Note that MODX has a USB audio interface, but it only works at 441.kHz, so it cannot be used as an audio interface for Jamulus. Typically the Jamulus app will set the audio interface sample rate for you, or will display a dialog indicating it couldn’t and that you interface can’t be used.
Once you are connected to the Internet, and your audio interface is working, double click on the Jamulus.app to open the application.
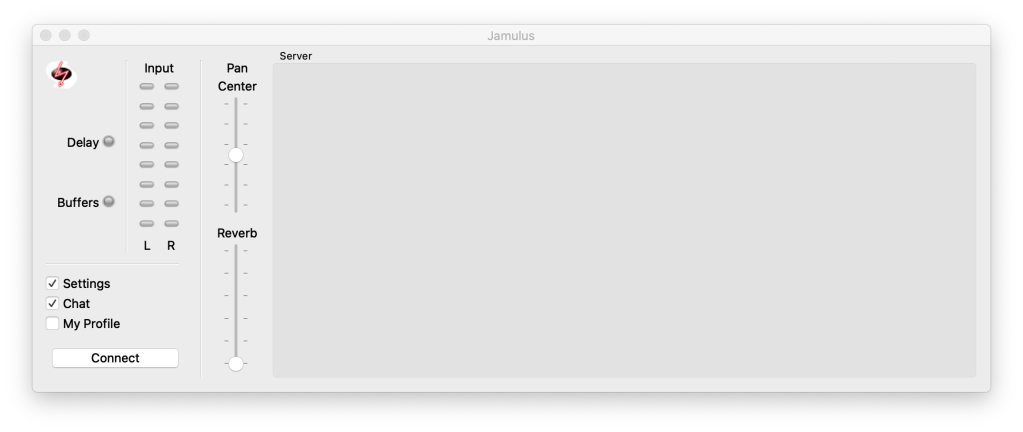
Profile
First, select My Profile to provide information about yourself that will be displayed to other players when you join a session.
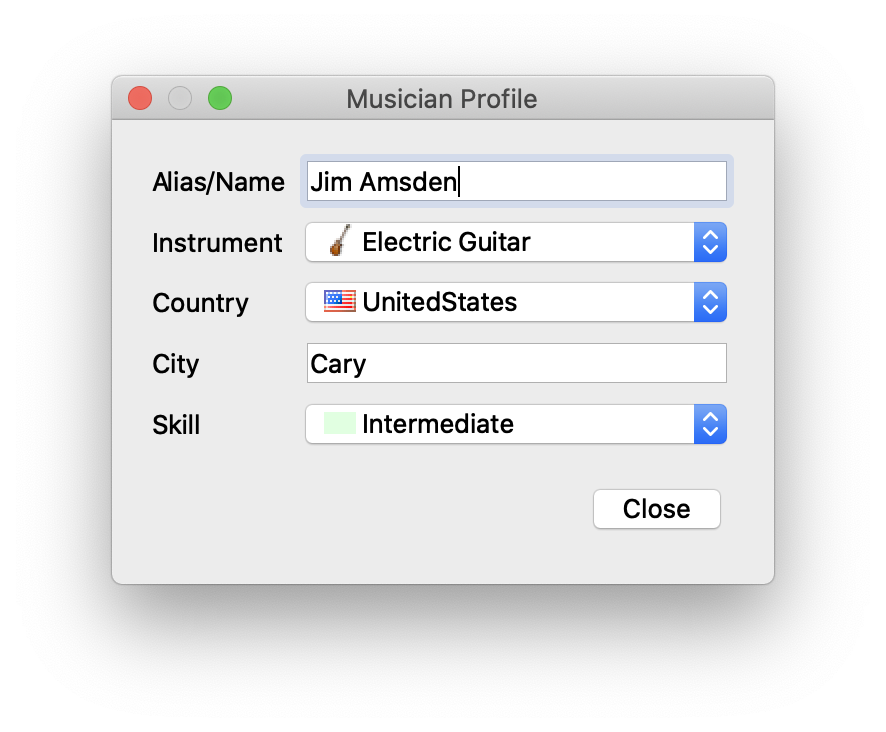
I don’t mind using my name and local address, but you might not want too. It’s helpful to provide your location and instrument so others will know where you are (how far away you are) and what instrument you are playing. And it’s nice to have your name to make it easier to communicate, and introduce ourselves to this new virtual music community.
Settings
Select Settings to open the settings dialog
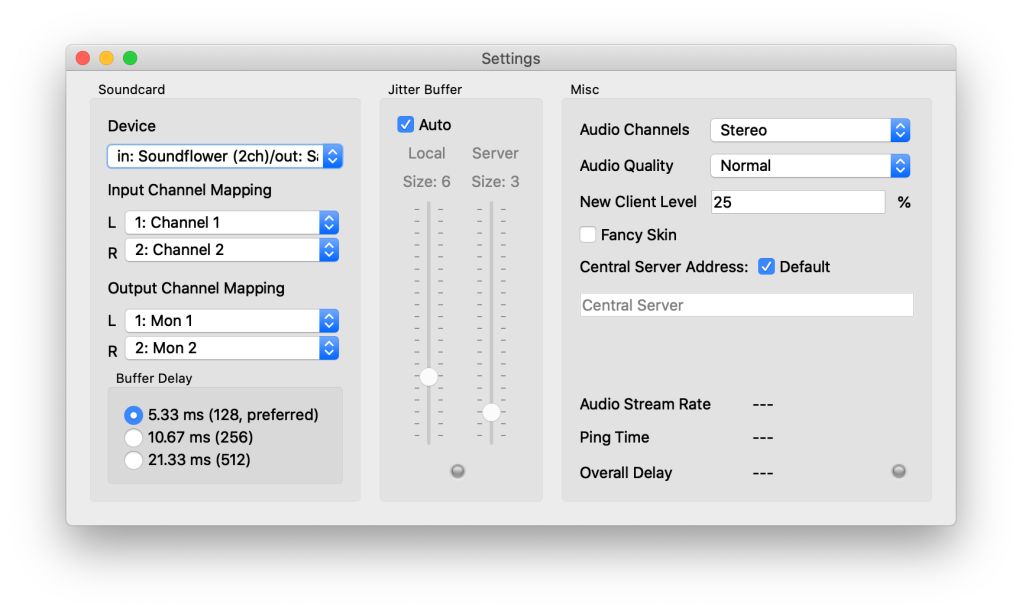
Use the settings dialog to configure the Jamulus client for your instrument and vocal. This section will describe the general settings that are available. Separate sections below go into more detail for specific scenarios.
Soundcard
This section is used to configure your audio interface. Jamulus only supports at most stereo input and output at 48kHz sample rate. It does not directly support additional tracks. We’ll cover that below by using Logic Pro X or Reaper (or any other DAW) as a digital mixer for extending Jamulus to support multiple tracks, instruments and audio processing plugins. But for this section will focus on the basics.
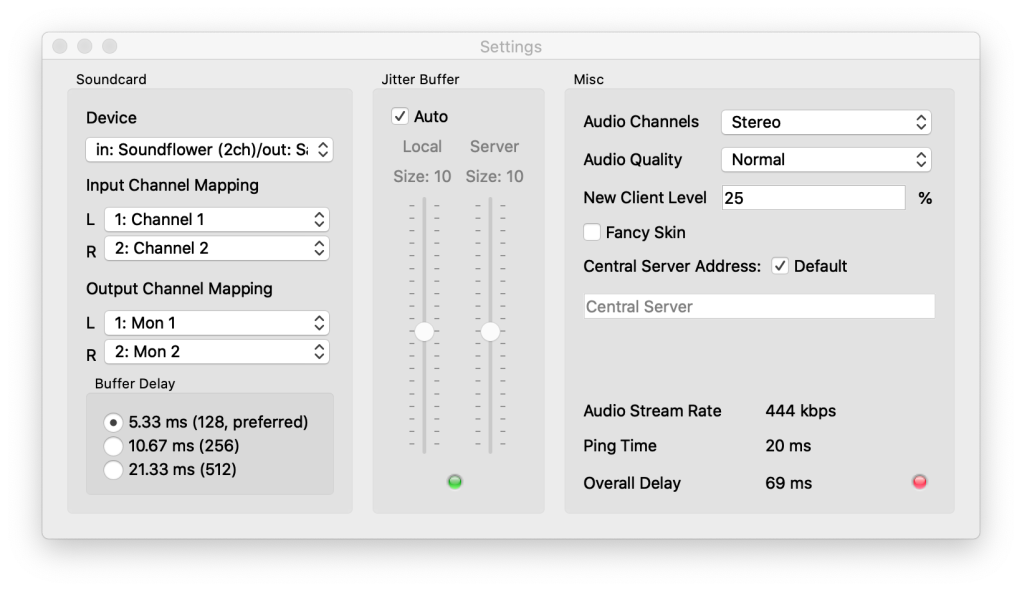
Device is used to select your audio input and output device. Clicking on the popup menu gives you a list of all of the input and output devices that are available on your machine. In the example above, I have selected Soundflower (2ch) as my audio input device and Saffire Pro 40 as my output device.

The menu list shows all possible combinations of input and output devices available on your computer. The output device should be the audio interface output that your headphones are plugged into. If you’re only using one or two inputs, the audio input device can be your audio interface. However, in this case, I want to have many tracks, so I’m using Soundflower (2ch) as my audio input device so I can route the output of Logic Pro X to the input of Jamulus. More on this in a section below.
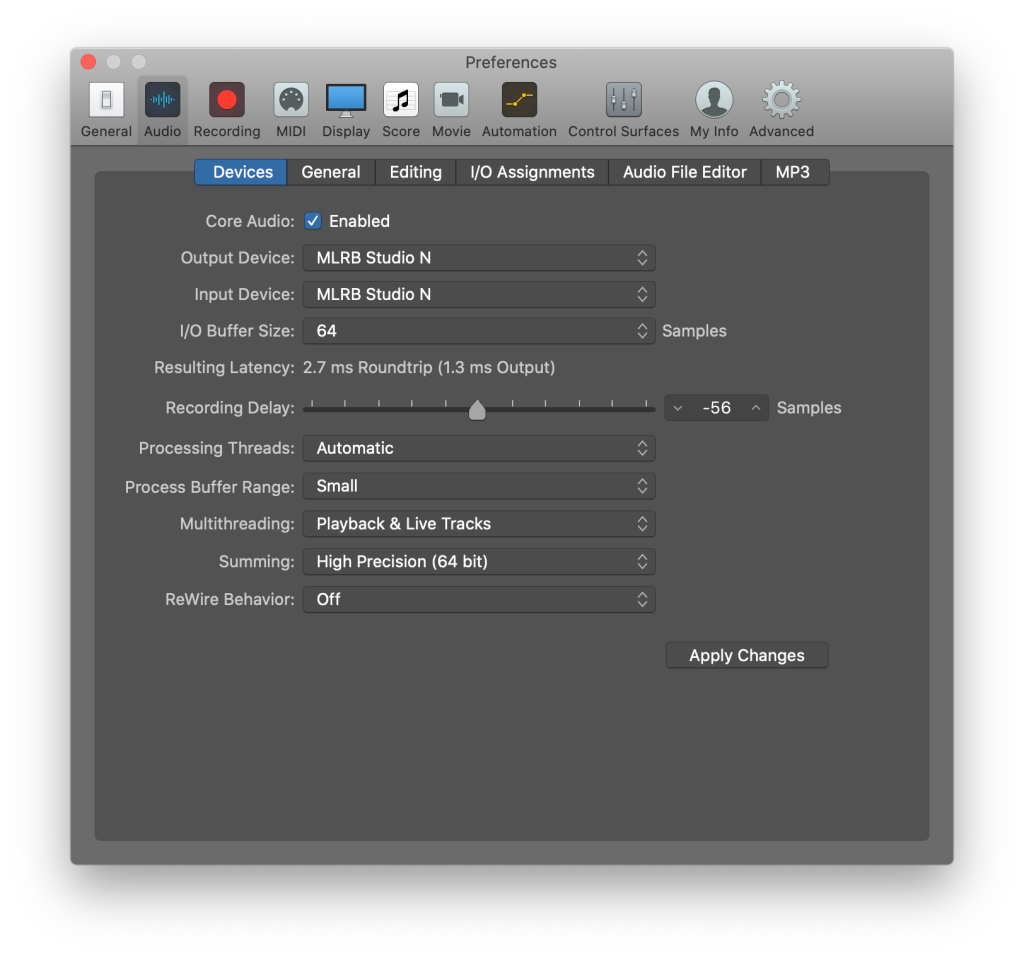
Buffer Delay
This is setting the buffers that control the delay of your audio interface. Most audio interfaces today are very fast and can support very small buffers. So the default 128 is probably fine. A new versions of Jamulus may even support 64 byte buffers which would cut the audio interface latency of 5.33 ms in half. 5.33 ms is not much latency. Thats the same latency you’d get from standing 5 feet from your amplifier. However, latency accumulates from multiple sources in Jamulus, and so minimizing it at ever point is important.
Jitter Buffer
When using Jamulus, you don’t listen to your instrument directly monitored from audio device in your interfaces, or live in the room (drums, acoustic guitar, vocals, etc.). You want to listen to the mix of all the performers coming back from the Jamulus server through headphones or IEMs. This way you’re hearing yourself time aligned with all the other musicians.
Latency or Delay in the Jamulus Settings dialog is the time it takes for something you played or sang to go through your audio interface into Jamulus client, over the Internet to the Jamulus server where it is mixed with everyone else, back through the Internet (a round trip) to your Jamulus client, and finally through your audio interface to your headphones. This can take a while and results in a delay between what you play and what you hear.
If that latency is below 25 ms or so, then it’s not particularly noticeable. Sound travels about 1000 ft/sec, so 25 ms is about 25 feet. When the overall latency (or Delay) is greater than 100 ms, it becomes pretty hard to play and especially sing.
You can leave the Jitter buffer Auto selected and Jamulus will attempt to optimize network latency against audio dropouts. Larger buffer sizes give more latency, but reduce audio dropouts and clicks and pops. Smaller buffer sizes reduce latency, but can result in more audio dropouts as the buffers become empty or overflow due to variations in network delays.
You can try to optimize the latency vs. audio dropouts yourself by turning Jitter Buffer Auto off and following this simple algorithm:
- While not playing, set the local jitter buffer for the client to balance latency with dropouts of the mixed signal you’re hearing coming from the server.
- Then play and set the server jitter buffer to balance latency and dropouts of your own signal sent to the server. Do this after you have set the local jitter buffer as these two are cumulative.
- Reduce the jitter buffer size (reducing latency) until dropouts become unacceptable, then increase the buffer size a little to account for network timing variation variation.
This algorithm attempts to achieve a balance between delay and audio dropouts. Its a compromise, and you will likely have more delay and dropouts than you might hope. It not great, but better than nothing.
Misc
Audio Channels: usually set to stereo, but you can choose mono or mono to stereo if you only have one audio input. Stereo takes more network bandwidth. So if you’re having too much latency or too many audio dropouts, you can try going mono.
Audio Quality: is how compressed the audio is that is sent to and received from the server. Audio quality can be Low, Normal or High. Start with Normal and reduce too Low if there is too much latency or audio dropouts. The more compressed the audio signal is the less bandwidth it uses.
New Client Level: sets the volume level for each new client that joins the session. Sometimes people can come in pretty loud. I set this to 25 to avoid having people come in really loud. It’s easy enough to turn them up.
Central Server Address: If Default is selected, then when you press the Connect button in the Jamulus client, a list of available servers is displayed so you can choose a server.
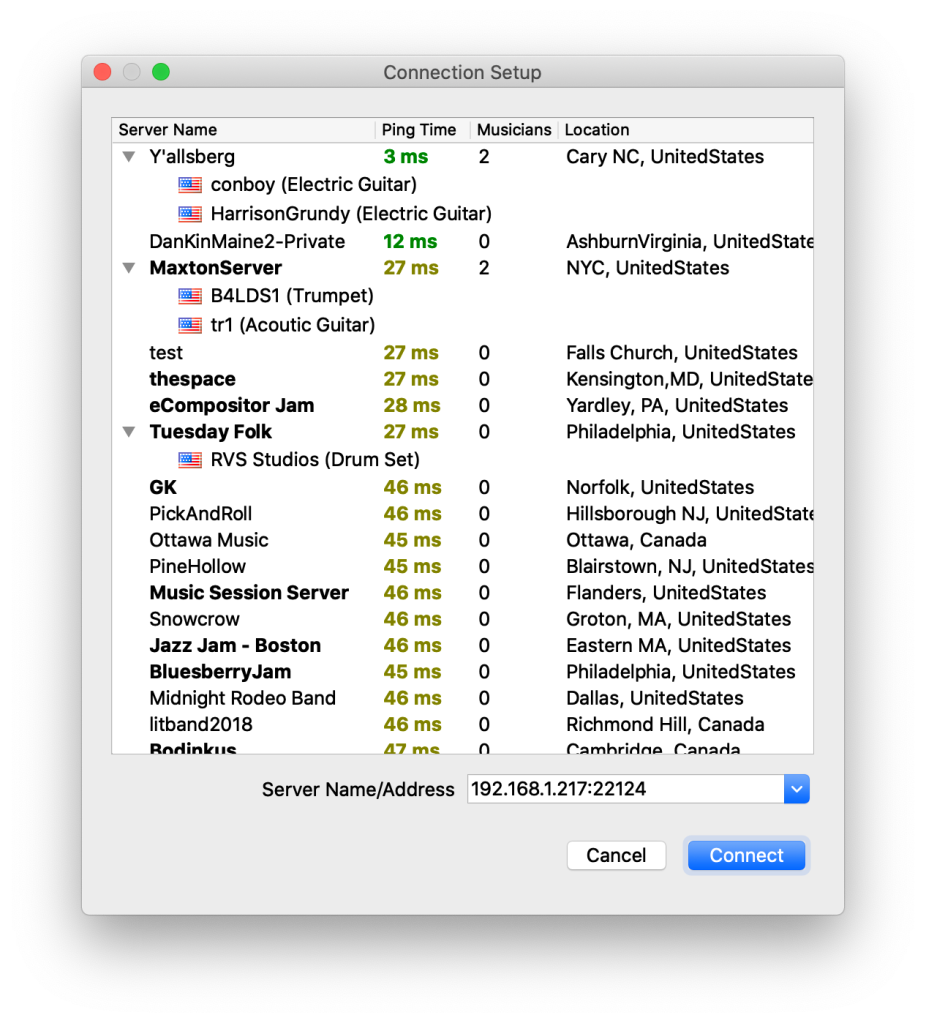
The list is sorted by Ping Time, so the servers with the lowest latency are displayed first in the list. If you expand a server (click the arrowhead) you can see who’s connect to the server and what instrument they are playing.
There is also a place where you can enter a specific Server Name/Address like 192.168.1.217:22124 which you can used to select your own server running in your own local network.
All these servers are public and open to anyone. Good etiquette would be to avoid connecting to any server that has private, invitation only, or some other similar text, and to announce yourself when joining others. Note that if someone joins you session, you can’t kick them out, but you can mute them.
For example, if I select the Y’allsberg sever in the above list, I see this in the Jamulus client:

You can mute, solo or control the volume of each of the performers in your own personal mix. Notice that you appear in the mix too, and that’s where you would control your own volume.
When you’re connected, the Setting dialog provides some additional information that helps determine your audio quality and latency.
The Jitter Buffer light will be green when the latency buffers are large enough that you are not going to get buffer overflow/underflow and audio dropouts. The Delay light in the Jamulus Client window, or the light in the lower right of the Settings window will be green if the latency is acceptable, or red if it’s too low. You can try to fiddle with the Jitter Buffer to keep both lights green as much as possible. But be prepared to deal with some latency and audio dropouts. It’s the nature of jamming on the web for now.
Other parameters that are displayed on the Setting page when your connected provide some indication on latency delay and audio quality:
Audio Stream Rate: 444 kbps. This is how fast you are trying to stream audio based on the Buffer Delay, Audio Channels and Audio Quality settings. Buffer Delay of 5.33 ms, Stereo and High quality result in an Audio Stream Rate of 657 kbps, and the lowest latency (but probably the highest audio dropouts). Buffer Delay of 21.33 ms, Mono, and Low audio quality results in Audio Stream Rate of 132 kbps.
Start with buffer Delay at 5.33 ms, Stereo and Normal audio quality to get a 444 kbps audio stream rate. Then make sure your Internet speed can handle this by running speedtest.net in a browser and ensuring your Upload time is greater than the audio stream rate. I’m on AT&T fiber optic, and my upload time is around 250 Mbps, so Normal or High quality is fine.
Ping Time: This is the time required to send a message out to the server and get a message back – it’s a measure of your Internet connection and Internet Service Provider latency. If your on Wifi, the pint time will be quite long. Try to use Jamulus with only wired connections. Note that when you join a session, your network latency will impact the overall latency of the whole session.
Overall Delay: This is a measure of the overall latency between your Jamulus client and the server. This will depend on your Internet connection, your service provider, how far away you are from the server, and how busy the network is. You might see this jump around quite a bit, and that’s why you need jitter buffers to turn this variable delay into a constant audio stream for you to hear.
If you’re connected to a server that has long delay and lots of audio dropouts, then jamming is not likely to be possible, or at least not that pleasant. But you can get use to some delay and dropouts just like we deal with crowd noise in a live gig. After a while you focus on playing not the audio quality and the remote jamming/rehearsing experience can be overall positive.
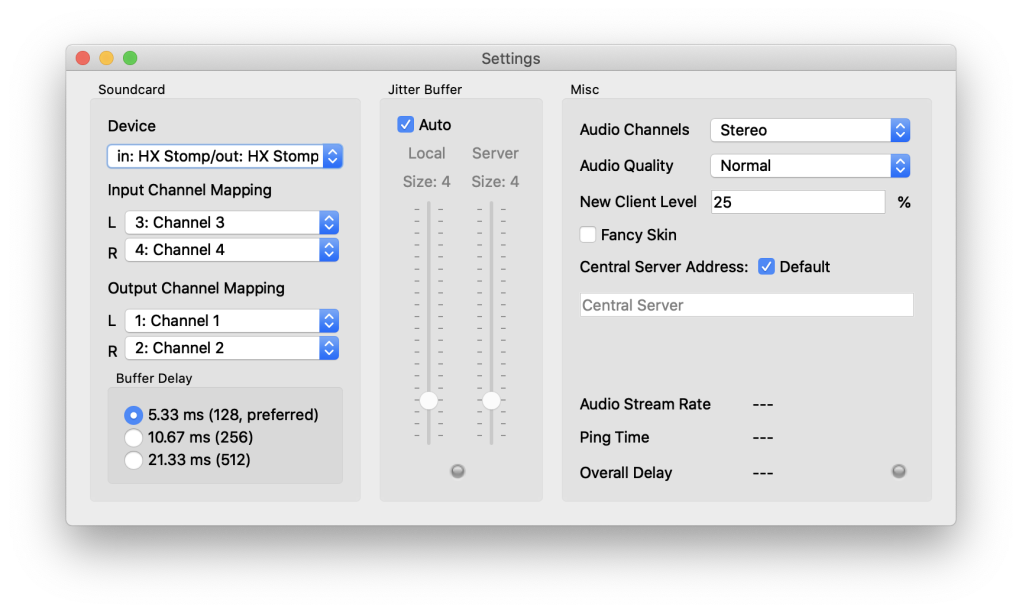
HX Stomp
HX Stomp makes a very convenient interface for Jamulus. It has all you need to support a guitar amp, effects and a microphone. Just plug in the HX Stomp USB cable into your computer and configure HX Stomp as the Jamulus audio device as shown below.
You’ll need to create a patch for Jamulus to support your guitar or bass, and a microphone. Its difficult to jam without being able to communicate with other musicians, and impossible to sing. So we need a way to configure HX Stomp to support a microphone.
I use this Jamulus patch for HX Stomp:

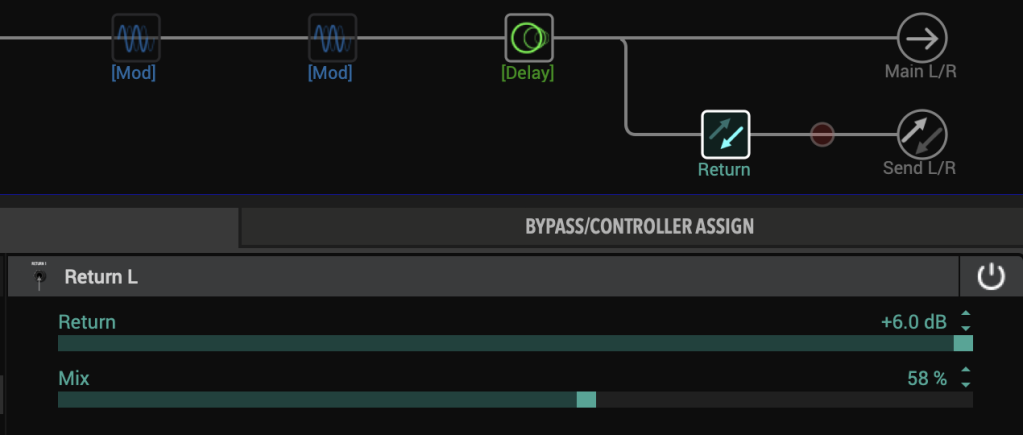
My guitar or bass plugs into the Main L/Mono input. The next 5 blocks are are a typical guitar setup: Heir Apparent distortion block into the Derailed Ingrid amp/cab block, followed by Harmonic Tremolo, Trinity Chorus, and Vintage Digital delay. This provides a pretty flexible guitar tone that can be used for lots of purposes. Notice there’s no Reverb block at the end where one might typical be. I had to give up the reverb in order to add the Return block which is used for the mic input. But Jamulus has reverb built in, so I can use that instead.
The Return block is on a separate path in order to be able to select Send L/R for the output. In order to understand why I used a Return for the mic in put instead of the Main R input, we have to understand HX Stomp routing as shown in the diagram from the Line6 HX Stomp manual:

Main L/R route is hard-wired to USB 1/2. So we can’t use USB 1/2 as audio input channels in Jamulus because Jamulus is using USB 1/2 for output to HX Stomp so you can here the mixed jam from the server through headphones plugged into HX Stomp. Main L/R would also be going through the headphones, which would mean you are monitoring the direct signal mixed with the delayed jam from Jamulus. This won’t won’t work, you have to turn off direct monitoring in HX Stomp so your are only hearing the output from Jamulus. The only way I could figure out to do that with HX Stomp is to configure Path B to output on Send L/R which is also USB 3/4, and set the Jamulus input to USB 3/4. Then the Split A/B is set to B 100, so no direct output goes to Main L/R, its all routed to Send L/R and USB 3/4.
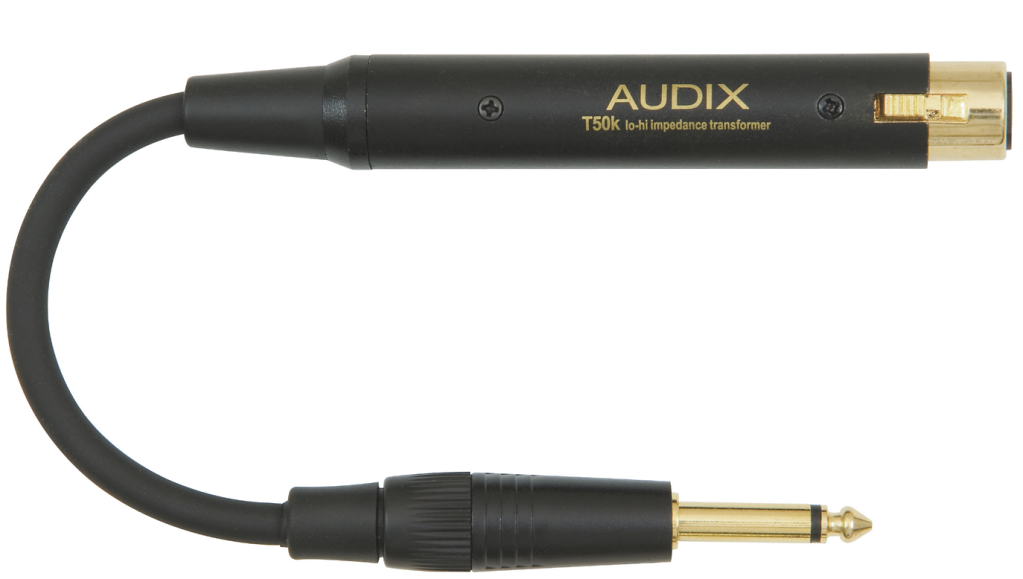
I used the Return block to split the path, and to provide an input for the microphone. You’ll need to use a dynamic mic, and an impedance matching transformer such as the Audix T-50K. Use one that has a short flexible cable for the 1/4″ plug, this will avoid putting a lot of strain on the HX Stomp Return input.
Boost the Return output to +6 dB as the mic has pretty low output. Then use the Return Block Mix control to balance the guitar/mic level you are sending to Jamulus.
Make sure the HX Stomp global setting are set to:
- Input Level – Inst
- Output Level – Line
- Send/Return L – Inst
This will provide enough gain for the microphone.
Using a DAW for multiple tracks and plugins
Jamulus only supports a stereo input and output device. If you have an external mixer, or your multi-channel audio interface that supports a software mixer, then you can use that to provide multiple instruments, vocal mic, etc. into Jamulus.
However, you can also use a DAW such as Logic Pro X, Reaper, Cubase, BandLab (formerly Cakewalk Sonar, and now free), etc. as a digital mixer to extend Jamulus to support multiple tracks, instrument and audio plugins including amp simulators like S-Gear, Helix Native, Amplitube, etc. This turns Jamulus into a multi-track remote, real-time studio.
The setup is a bit complicated, but is worth the trouble. Basically you’re going to configure the input of your DAW to be your audio interface and the output of you DAW will be connected to a virtual audio device to the input of Jamulus, which is in turn connected to the output of your audio interface – your DAW is inserted in the input to output signal path in front of Jamulus.
The following instructions are for macOS and Logic Pro X. The technique will be similar for Windows, but the details will be different.
1. Create an Aggregate Audio device
What we want to do is use your audio interface as input into Logic Pro x (they way you normally would), but set the Logic Pro X audio output to to the Soundflower (2ch) virtual audio device. Soundflower is a virtual audio device that lets you connect the output of one audio application to the input of another. That’s just what we want to do.
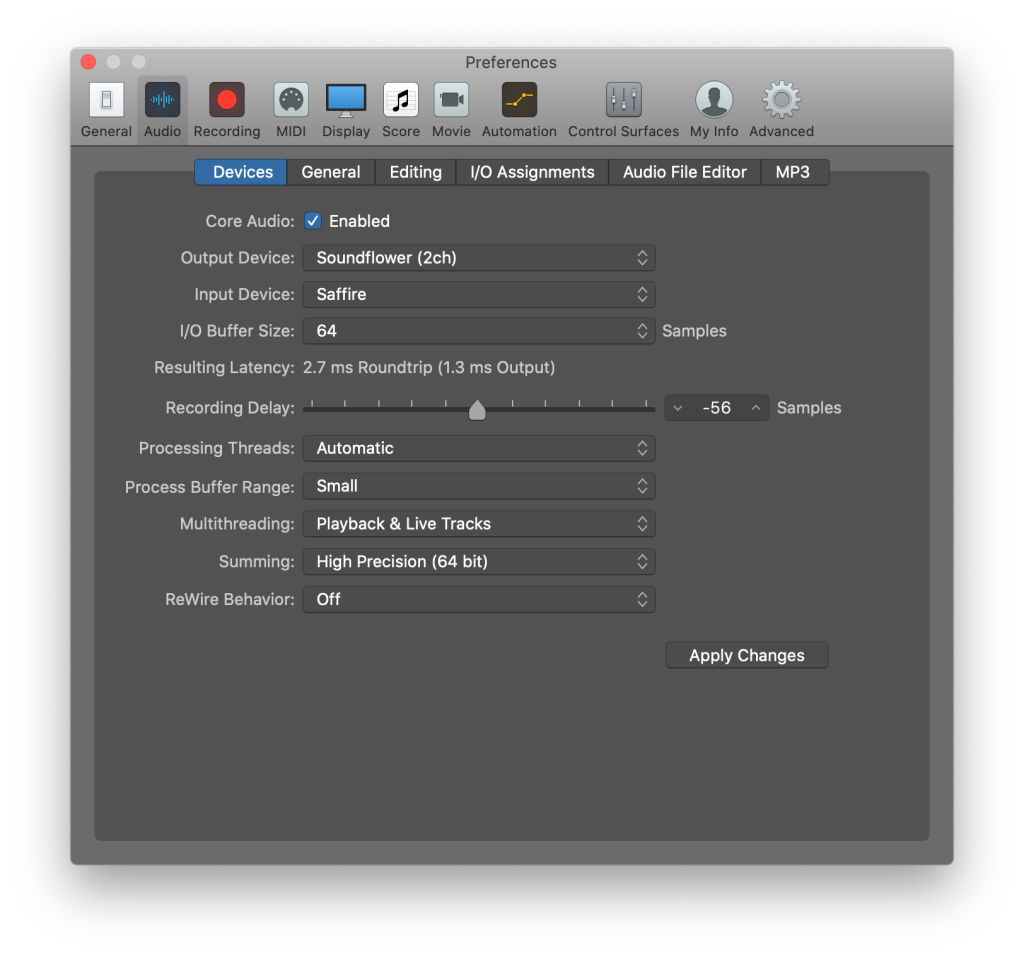
Now you could just use Logic’s Audio settings to set the output device to Soundflower (2ch) and the input device to your audio device, Saffire in my case.
This would work fine, but its not convenient. The audio device settings in Logic apply to the application as a whole and are not stored with the project. So every time you use Logic for some other purpose, you would need to reset your audio input device. That’s ok, but if you forget, you’re going to be wondering why you aren’t hearing and output.
Alternatively you can create an Aggregate device that combines your audio interface with Soundflower (2ch) and use that for all your audio processing. Use the Audio MIDI Setup utility to create an aggregate device.
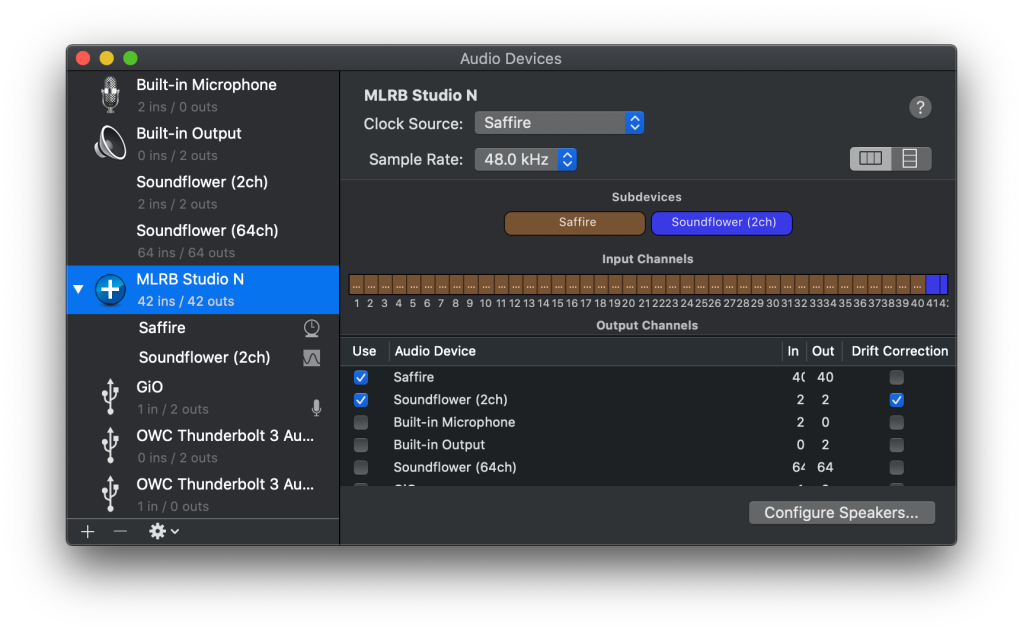
Then Set Logic Pro X to use that aggregate device for both input and output.
2. Create a Jamulus Logic Pro X project
Next let’s look at how to create a Logic Pro X project to use with Jamulus. This will be the mixer for your Jamulus tracks and plugins. Here’s the Jamulus.logicx project I created:
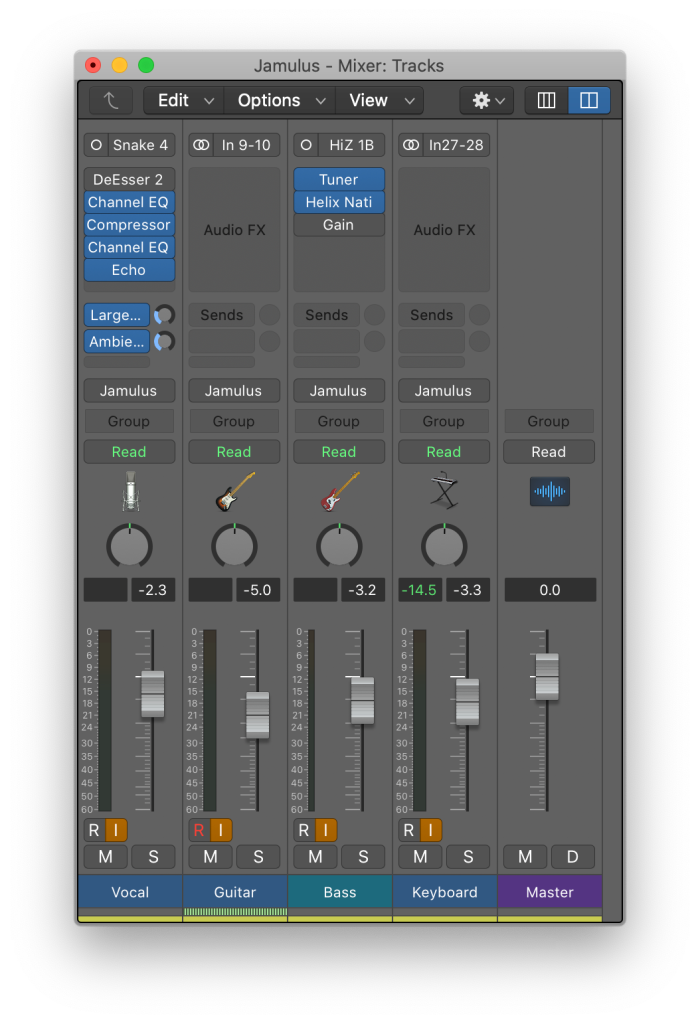
I have my vocal mic plugged into channel 4 of my audio interface, and my Helix SPDIF output coming into channels 9/10, the Saffire SPDIF input. I do it this way because its the same configuration I use in my studio for recording and rehearsals. I also have my bass and MODX keyboard connected to my audio interface so I can play those too. I have the typical effects on my vocal channel, and am using Helix Native to provide the bass amp simulator. My guitar and MODX don’t need any effects as they are already provided by the devices.
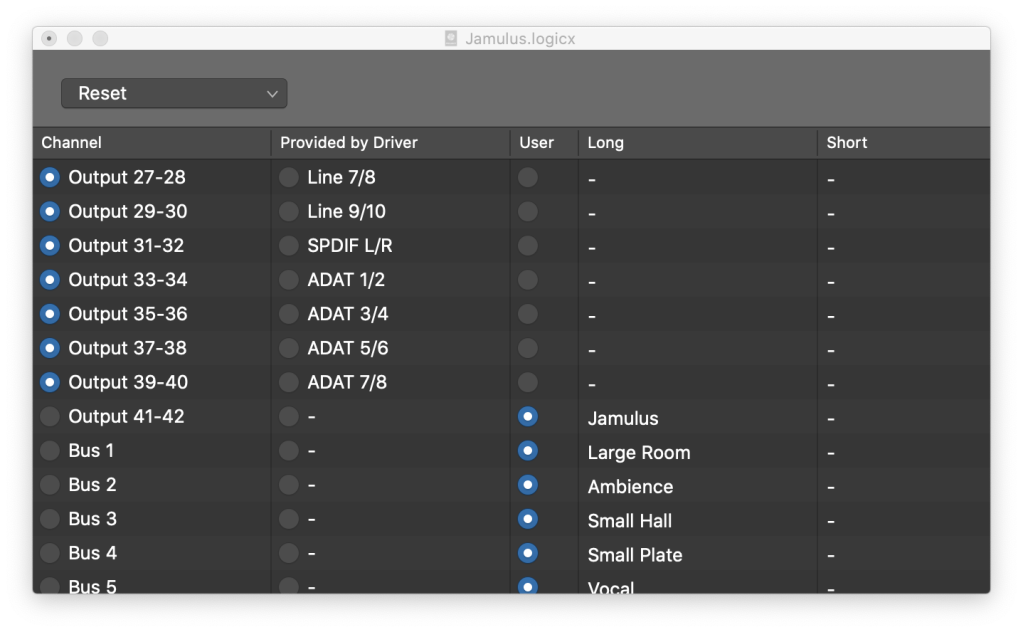
So far this isn’t any different than how you might configure your DAW for any recording or rehearsal project. What’s different is that I’ve configured Jamulus as the stereo output which connects the Master output of Logic to the input of Jamulus using Soundflower (2ch) to connect the audio output of one app to the audio input of another. For convenience I have used Mix > I/O Labels… to name stereo output 41/42 to Jamulus to make it easier to remember. Thats the output for Soundflower (2ch) which you saw in the Audio MIDI Setup utility for the aggregate device.
I can now mix my vocals, guitar, bass and keyboards going into Jamulus using this simple, typical Logic Pro X project. This dramatically expands the capabilities of Jamulus.
Running a Jamulus server
One of the big advantages of Jamulus is it is very easy to create your own server and register it with the Central Server so other people can connect using the Jamulus client. This allows Jamulus to scale to support many sessions without requiring complex server clustering techniques. It also lets you position the server closer to the performers. Internet latency is greater the further away you are from the server. Generally the latency will be quite low with good Internet connections and good ISPs if you are within the same Zip code. Access from adjacent towns might be pretty good too. Once you go across state lines, latency could get too large for playing in real time. But I did jam with a bass player from Germany the other day, and it was fine.
The Jamulus server is in the same app as the Jamulus client, you just start the app differently. You can of course have both of them running at the same time, and on the same computer.
On macOS, you run the Jamulus server by opening the Terminal app and entering the following command:
/Applications/Jamulus.app/Contents/MacOS/Jamulus -s
There are other command line options that you can use that are documented in Configuring Jamulus. But many of the most useful options can be configured in the server UI.

If you select Register My Server in the Server List at the Central Server, the Name you enter will show up in the Connection list and others will be able to connect to your server. If you don’t select this, then you will have a private server that only people who know the IP address and port for this server will be able to connect to.
There are a few connection quirks to be aware of. First macOS is going to popup a dialog asking you if you want to accept incoming network connections to your Jamulus server. Until you press Allow, no Jamulus clients will be able to connect. That can be surprising if the server is on a computer in another room.

You can fix this by adding an exception for Jamulus.app in the Security & Privacy Firewall settings:

Second, when the server is running in your own local area network, you may not see the server name in any Jamulus client running in that same network. So to connect you can enter the IP address and port. To get you IP address on macOS, open your Network Preferences and you’ll see your IP address under the Status field:
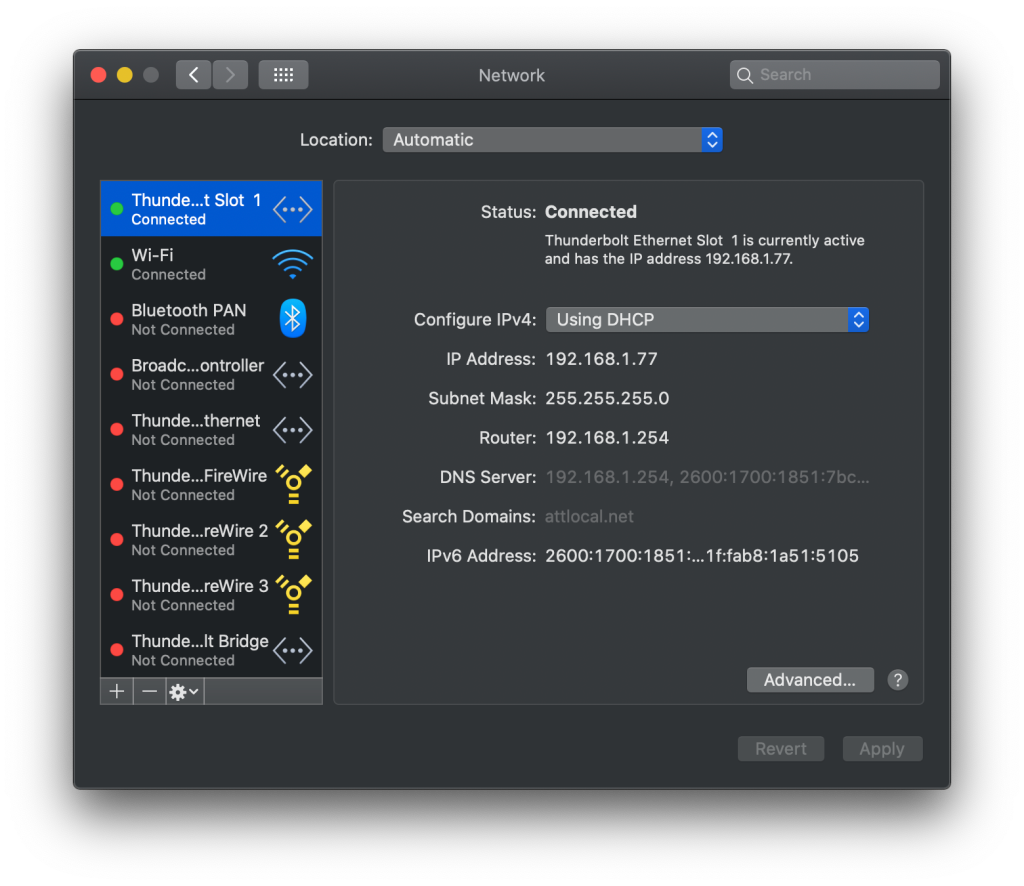
Then enter the IP address and Jamulus NAT port (Jamulus default port is 22124) in the Server Name/Address field:

This is the same way you would enter the IP address and port for a private Jamulus server.
Note my server, MLRB Rehearsal, is visible in the Connection Setup dialog even through it is running on the same computer as the Jamulus client. It just took a few minutes for it to show up. But its good to know how to directly connect to a private server too.

Pingback: Remote rehearsal software – Swingology – DC-based Band
Bonjour, isn’t there an error in “(…) To get an idea how this impacts playing, consider that you get about 1msec of latency for ever 10 feet from your amplifier. 50 feet woud be about 5msec. (…) “. The speed of sound -under normal conditions- is 1.125328 feet per millisecond. So the latencies one would hear are 8.89 ms (for 10 feet) and 44,43 ms (for 50 feet). I usually grossly round it to 1 feet ~ 1 millisecond.
Thanks for correction or confirmation.
Merci
Hello, I’m particularly interested in getting my DAW = LPX running on OS 10.14.6 feeding into Jamulus. Particularly to get 1 virtual instrument to play, plus a drum track to keep time. I followed your detailed section on this, but am unable to get the O/P channels feeding, or indeed indicating Jamulus instead of Output 1 + 2 as per standard.
Jamulus, after quite a bit of hair tearing is up and running and I have my own public server. Jamming using my inboard mic on the MBPro is fine if I keep amongst the green delay time servers. I was even able to get a France – Australia guitar duo happening without too much delay.
In any event – would you have the time and inclination to help me see the error of my ways ?
I can be reached at;
ecnalnixod@gmail.com
brunswickn10@gmail.com
Social media on;
+33 6 349 049 26
Thanks in advance.
Lance DIXON
PS I have Team Viewer installed too.
You will need to use some sort of virtual audio device like Soundflower, Loopback Sound Siphon, etc. to map the output of your DAW to the input of Jamulus, and then set the output of Jamulus to you audio device output. Essentially inserting your DAW between your audio interface input and Jamulus/Jamkazam.
Hello, and thank you for getting back to me.
Soundflower – installed and working. (2ch or 64ch)
Available in Midi-Audio setup.
Presonus Firebox audio interface connected to MBPro via Thunderbolt.
Recognised in Midi-Audio setup.
I followed your copious instructions and screen shots as far as they pertained to my equipment, but was never able to get the output of Logic Pro into the Jamulus client. Jamulus works fine with an inbuilt mic and speakers (Headphones) configuration on the Mac – my public server is visible and operational, so ALL good on that point.
Would it be helpful to send you screen shots?
1. Midi-Audio config.
2. Logic mixer window
3. Logic Audio preferences setup
If not here, via email?
All the best – hope to hear back from you soon.
Lance DIXON
Thank you for a very thorough and enlightening feature
I was so hopeful when I read this. I’ve been looping for days trying to find a way to get Logic X into Jamulus. I followed your notes explicitly except that I’m using Blackhole instead of Soundflower. I have tried Sound flower in the past few days but having uninstalled everything and started again, I thought I’d go with Blackhole as one day I will want to run two instances of Jamulus – one for guitar stereo and one for vocal stereo. Anyway, all looks good except that Jamulus ‘inputs’ do not show the blackhole outputs as an option. This happened with sound loud as well as Loopback. Any ideas?
Hi Jim
I run a non-commercial chior with some 24 people, some 20 singers and 4 acoustic instruments. Bearing in mind the number of partners singing together, proabably only about 16 -18 input mikes would be usedAll but one would use PCs of varying age and capabilities, but Windows 10 would predominate. None of us have additonal hardware when it comes to audio, although I do use Audacity when it comes to editing and producing MP3 pieces. Our average is some 65-70 years.
Your article on line makes fascinating reading, but worries me that some of us may be a little unadventurius when it comes to technical matters. However, I am willing to give Jamulus a go. Internet speeds are usually around 37 down and 9-10 up, not particularly high.
Can you confirm what other hardware we might need? and whether we might need to se a Google Cloud, or not?
Thanks
Edwin Macadam
Hello
Ive got a MODX and I am having problems because of the sample rate. How can I fix it – is it necessary to buy an audio interface (question mark)
Thank you for the great article
MODX only supports 44.1kHz. It is what it is.
Hello, I have Jamulus installed on a MacBook Air, Mojave (10.14.5), with a Focusrite Scarlett 2i2. Signal goes through in/out audio interface but signal doesn’t show in Jamulus… is there a setting do I need to change? I can see and hear the other musicians, but they can’t hear me.
I also tried an older MacBook Pro that receives a signal in Jamulus from the built in mic/speakers, but doesn’t “see” the Focusrite Scarlett 2i2 audio interface.
Thanks in advance for any tips.
Mike Starkey
cell: 707.585.7887
You should be able to see you 2i2 in the drop down menu when you are configuring your audio devices in JamKazam. If you can see it in Audio MIDI Setup app, then you should see it in any app that choses an audio device.
This is a very comprehensive and helpful article. Thank you for taking the time to put it together.
Pingback: We Tried to Rehearse During the Pandemic – Whispering Pines Trio
Zoom proved to be futile and Jamulus appears to be the best solution for a near full duplex operation. The majority of musicians I encountered thus far have either a IPAD mini-2 or IOS phone, up to the IPAD Pro 12.9. (1) will Jamulus function with IPADs? It intuitively appears that setting up a private server is a big plus! (2) Will a std WIN 10 PC do the job and if so what would its minimum processor and cpu speed need be?? Great Job and Thank you for all that you have done!
Try JamKazam too. No iPad solution – you need to be wired to your router with an Ethernet cable to get maximum speed. Win 10 PS should work fine.
Hey jimamsden…THANK YOU very much! I believe there is a apple plug adapter that allows a Ethernet cable connection but setting aside the required cable internet connection, will Jamulus setup recognize IPAD/IOS? Also regarding a Private Server for subscribed Jamulus users, would you know the required Computer/OS (Win10/Mac) minimum requirement(s) or its info where-about? Again… Thank you for your response!
Can I ask what is the best method for adding video conferencing to the jamulus sessions? I am looking into setting up an EC2 Cloud server for Jamulus. How would I add video?
I’d recommend JamKazam if you want integrated video.
Great narrative…thanks very much. You mention using a Helix as the audio interface. This is what I would be doing, making a Jamulus patch for guitar and effects, then the next Block line for the microphone. Would you recommend creating stereo patches instead of mono, or does it matter..??
Could you expand a little bit more please as to how you would hook in your Helix to work with Jamulus. I think I have a basic idea, but I would like to hear exactly what someone who knows what they are talking about explain it. I actually have a Helix LT that I will be using, but they are mainly the same (Helix, Helix LT).
If there is any other area of discussion you feel anyone else should know or have to use, can you please include some discussion about that also.
Thanks very much…stay safe and healthy
Don H.